User account recovery in wallet services is regaining access to an account when login credentials are forgotten or inaccessible. Regaining control over their funds and resuming using the wallet service is vital.
1. Account Recovery Using Email
1. Open YaYa Wallet App
![]()
2. Navigate through the introduction pages until you reach the login screen.

3. Tap on "Recover".

4. Enter your username (your name and your father's name combined, without spaces, up to 12 characters).

5. The system will prompt you to enter your email address (use the email address you used when creating your account).
- Tap the "Send Password Reset Email" button**.**

7. Go to your email and open the email you received from YaYa Wallet.

8. Click on the link

- You will receive One Time Password (OTP)via SMS.

10. Enter the OTP.
11. Tap the "Submit" button.

12. You will be prompted to create a new password.

13. Enter your new password.
14. Re-enter the new password for confirmation.
15. Tap the "Reset password" button.

16. Return to the app and tap the "Login" button.

17. Enter your phone number and your new password.
18. Tap the" Login" button.

Congratulations! Your account recovery process is now complete. You're all set to log in and continue using your YaYa Wallet account.
If you have any further questions or need additional assistance, feel free to reach out to our support team.
2. Account Recovery Using Guardian
User account recovery using guardians involves trusted individuals, known as guardians, who assist a user in regaining access to his/her account in case of forgotten password or other login issues.
The general overview of how it works:
-
Setting Up Guardians: During account setup or management, a user can designate guardians by using their account information (like username or phone number).
-
Guardian Confirmation: Guardians receive a request from the service for their role and they may confirm and accept the request.
-
Account Recovery Initiation: If users forget their login details or face access issues, they can start the account recovery process. The service typically allows requesting help from designated guardians.
-
Guardian Verification: This service uses designated guardians for identity verification, ensuring only trusted participants. They may need to provide personal info or follow specific procedures.
-
Guardian Collaboration: Once guardians verify their identities, they may perform actions or provide information to assist in account recovery, such as sharing recovery codes or confirming user details.
-
Account Recovery Completion: After guardians fulfill their roles, the service assesses the information. If it meets requirements, account recovery is facilitated, granting access to the user's account.
To setup and activate your guardians, please follow these steps:
Step 1. Click on Profile
Step 2. Click on Security
Step 3. Click on Account Guardians
Step 4. Click on Add Guardians
Step 5. Search for at least three guardians by their username or phone number and send invite
Step 6: Your guardians should Accept your request to be your guardians
Step 7: Click on Activate Guardians:
Step 8: Click on Activate: To activate all the nominated guardians that accepted the request
Step 9: Finally, your guardians are active: After this you can start account recovery steps
Please refer to the screenshots below for more information:
1.

2.

3.

4.
.jpg)
5.
.jpg)

6.

7.

8.

After Setting Up Guardians let's proceed to account recovery initiation:
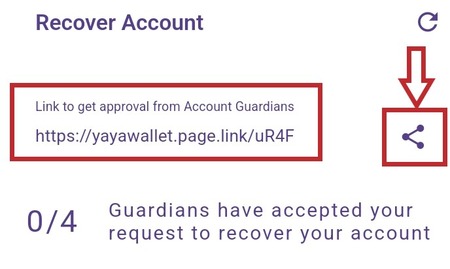
Step 1: click on Recover
Step 2: Send the link to your guardians to accept your account recovery request
Step 3: After you send out the link to your guardians, they should open the link and accept the request
Step 4: You need to wait 24 hours to set a new password
Step 5: Set a new password
Step 6: Enter your new password to login
Step 7: After clicking on login, you have successfully recovered your account
Please refer to the screenshots below for more information:
1.
.jpg)
2.
3.
.jpg)
4.

5.

6.

7.
.jpg)